Step 1 - Resizing the partition
Here is an example of how to resize a partition inside Linux.
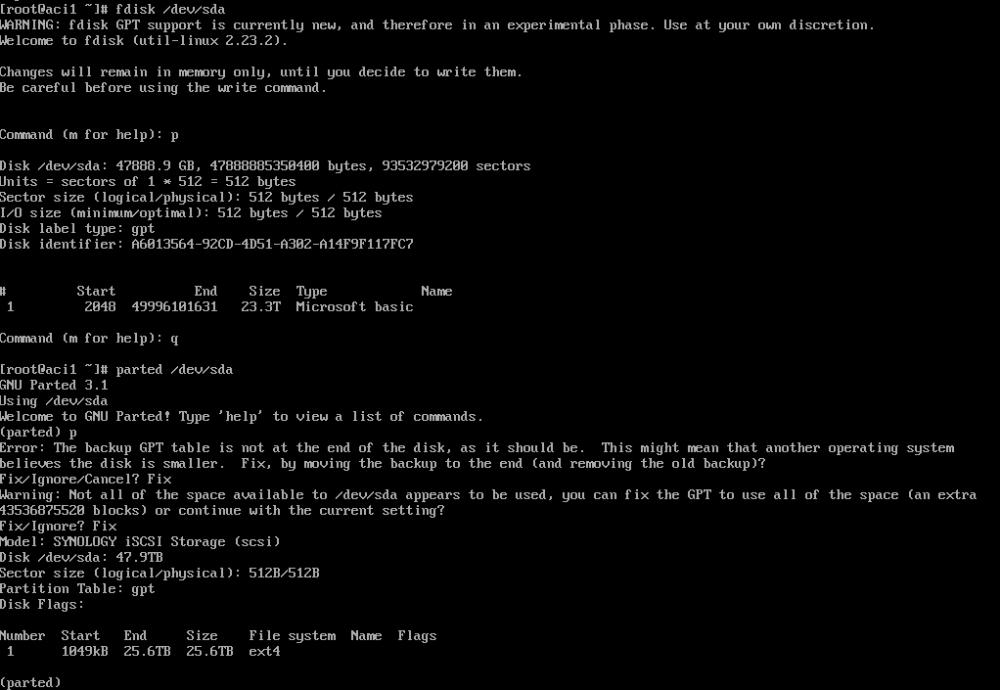
$ sudo fdisk /dev/sda

Welcome to fdisk (util-linux 2.27.1).
Changes will remain in memory only, until you decide to write them.
Be careful before using the write command.


Command (m for help): p
Disk /dev/sda: 9.8 GiB, 10485760000 bytes, 20480000 sectors
Units: sectors of 1 * 512 = 512 bytes
Sector size (logical/physical): 512 bytes / 512 bytes
I/O size (minimum/optimal): 512 bytes / 512 bytes
Disklabel type: dos
Disk identifier: 0x0cd7105f

Device     Boot   Start      End  Sectors  Size Id Type
/dev/sda1  *       2048   999423   997376  487M 83 Linux
/dev/sda2       1001470 16775167 15773698  7.5G  5 Extended
/dev/sda5       1001472 16775167 15773696  7.5G 83 Linux LVM

Command (m for help): d
Partition number (1,2,5, default 5): 2

Partition 2 has been deleted.

Command (m for help): n
Partition type
   p   primary (1 primary, 0 extended, 3 free)
   e   extended (container for logical partitions)
Select (default p): e
Partition number (2-4, default 2):
First sector (999424-20479999, default 999424): 1001470
Last sector, +sectors or +size{K,M,G,T,P} (1001470-20479999, default 20479999):

Created a new partition 2 of type 'Extended' and of size 9.3 GiB.

Command (m for help): n
All space for primary partitions is in use.
Adding logical partition 5
First sector (1003518-20479999, default 1003520):
Last sector, +sectors or +size{K,M,G,T,P} (1003520-20479999, default 20479999):

Created a new partition 5 of type 'Linux' and of size 9.3 GiB.

Command (m for help): x


Expert command (m for help): b
Partition number (1,2,5, default 5):
New beginning of data (1001471-20479999, default 1003520): 1001472
Expert command (m for help): r
Command (m for help): p
Disk /dev/sda: 9.8 GiB, 10485760000 bytes, 20480000 sectors
Units: sectors of 1 * 512 = 512 bytes
Sector size (logical/physical): 512 bytes / 512 bytes I/O size (minimum/optimal): 512 bytes / 512 bytes
Disklabel type: dos Disk identifier: 0x0cd7105f
Device     Boot   Start      End  Sectors  Size Id Type
/dev/sda1  *       2048   999423   997376  487M 83 Linux
/dev/sda2       1001470 16775167 20479998  7.5G  5 Extended
/dev/sda5       1001472 16775167 20479999  7.5G 83 Linux
If asked about keeping an XFS signature, select yes
If the extended partition is LVM, change back to type LVM using the following commands

Command (m for help): t
Partition number (1-5): 5
Hex code (type L to list codes): 8e
 Changed system type of partition 5 to 8e (Linux LVM)
Command (m for help): w
Reboot the server which will make the new resized partition available for resize. However you can sometimes use the following command to rescan the partitions without a reboot
partprobe
Step 2 - Increasing the size of the filesystem
If the filesystem is ext3/ext4 use the following command to grow the drive (Centos 6 and previous versions)
# View the current size
df

# Resize the filesystem
resize2fs /dev/sda2

# View the new size
df
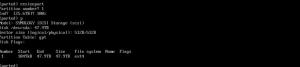
If the filesystem is xfs use the following command to grow the drive (Centos 7 and later)
# View the current size
df

# Resize the filesystem
xfs_growfs /dev/sda2

# View the new size
df
Alternative to Step 1 - Using Parted
Here is how to resize using parted. Parted does require that the partition be unmounted first, depending on the type of disk you can enter single mode.
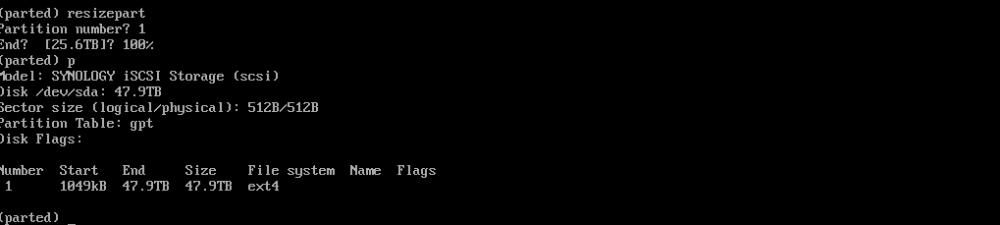
# Start Parted on the required disk
parted /dev/sda

# Print the partition table
p

# Resize the partition
resizepart

# Enter the partition number (from the partition print from before)
1

# Enter in the size of the partition, in this case 100% to fill all remaining space
100%

# Quit Parted
quit

# Resize the filesystem to the partition size (sda1 in this case). You can use the -f option to force the resize without checks (not recommended)
# Due to the size of the volume, this took some time with resize2fs sitting at 100% CPU for an hour or two. Don't cancel it!
resize2fs /dev/sda1

Resizing LVM partitions
When resizing LVM partitions, there are a few extra steps that need to be added. First you need to resize the actual partition using the steps above. Remember to make sure the system ID is the same
To resize follow the following instructions;
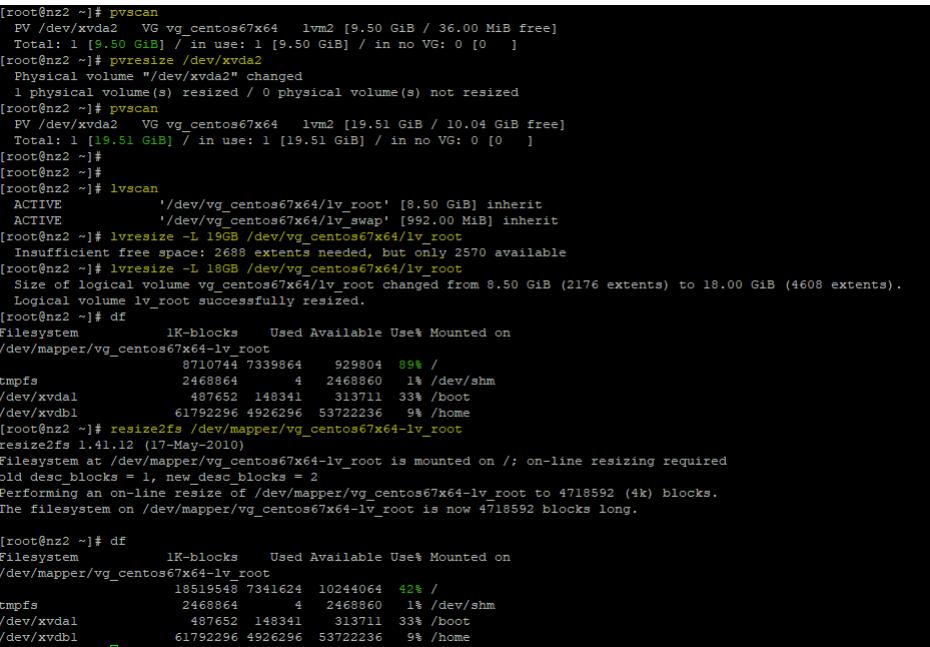
# Scan for a physical volume and confirm you get the right device name
pvscan

# Resize the physical volume
pvresize /dev/xvda2

# Confirm the volume has been resized as expected
pvscan

# Scan for logical volumes
lvscan

# Resize the logical volume (where -L is the size you want to resize to)
lvresize -L 18GB /dev/vg_centos67x64/lv_root

# Resize the filesystem to have the new space allocated
resize2fs /dev/mapper/vg_centos67x64-lv_root

# You can specify a size, by adding to the end of the end of the resize2fs) and the type at the end, either M = MB, G = GB, T = TB,
resize2fs dev/mapper/vg_centos67x64-lv_root 600G
Here is an example using the values above. You can see the commands highlighted in yellow and the new sizes highlighted in green. Running df in between the resize2fs shows the original and new sizes of the resized volume. I also tried to run lvresize with a partition size that was too high, so went from 19GB to 18GBs for that partition. Using resize2fs is for ext3 and ext4 filesystems, if you are using XFS you would use growfs as per the above instructions.
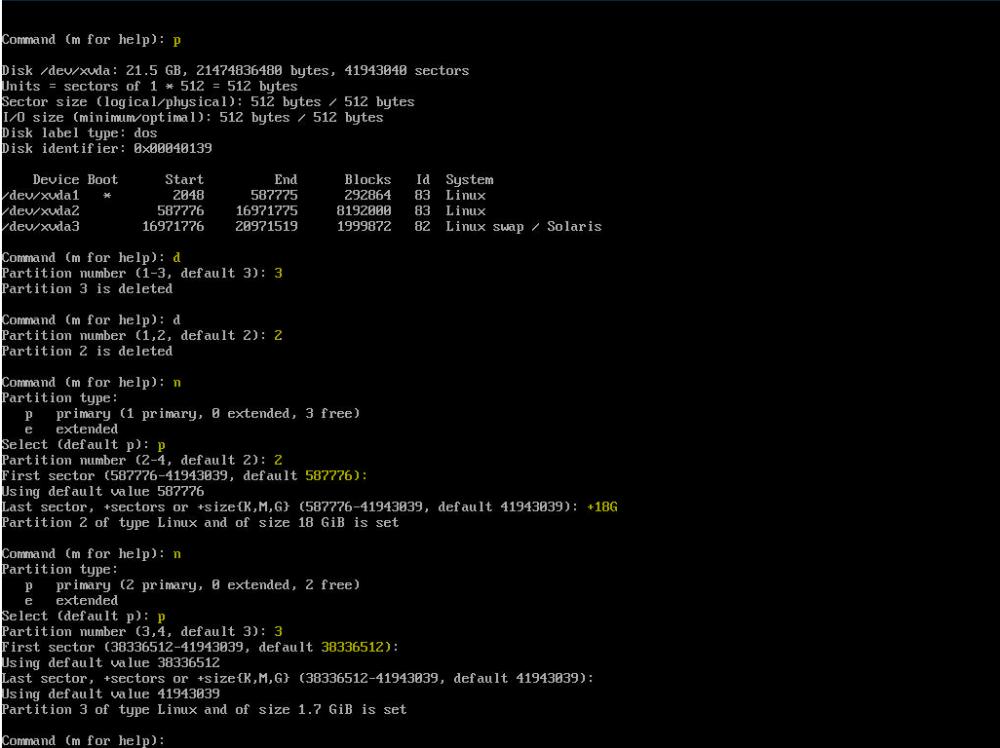
Resizing when swap is at the end of the partition table
We recently had a problem with swap being the last partition on the disk with the root drive being in the middle. To get round this we need to disable swap, remove the swap partition, resize the root partion, create a new swap and then enable swap again on the server.

# Disable Swap
swapoff -a

# Go through parition remove and add as per above, shown in screenshot below;
fdisk /dev/xvda

# Once done, reboot
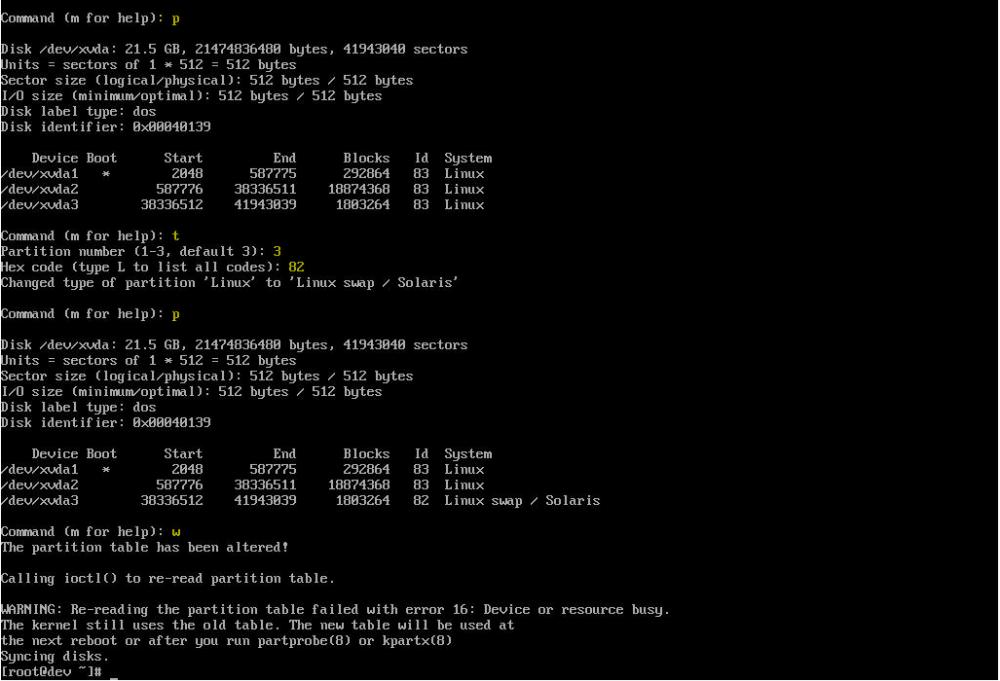
The server will take a little bit more time to reboot as it tries to enable swap on an uninitialized partition. Once it has restarted, we need to enable swap again
# Reboot or run the following command to rescan partitions
partprobe

# Format swap partion
mkswap /dev/xvda3

# Enable swap
swapon /dev/xvda3

# Confirm that swap is enabled, you'll see that swap now has a total size
free

# You can also verify that swap is enabled by running
swapon -s

Now we need to have swap mount on bootup
# View partition UUIDs
blkid
/dev/xvda1: UUID="ea9a6441-5a71-467e-97de-182b22e0a718" TYPE="xfs"
/dev/xvda2: UUID="7f726a65-1329-4bfd-a2cb-9454641be3d1" TYPE="ext4"
/dev/xvda3: UUID="" TYPE="swap"

# Modify FSTAB
vim /etc/fstab

#Replace the swap partition section of FSTAB with the UUID you found with blkid (highlighted in orange in screenshot below), then reboot.

Optionally reboot to confirm fstab is working correctly
Resize the partition e.g.
resize2fs /dev/sda2